寻找天使

nuffnang

Showing posts with label TUTORIAL. Show all posts

Sunday, April 28, 2013

How to pick a good photo?

How to pick a good photo out of hundreds shots? I had ask myself this question again and again but has no answer for it, as it seems like shots that I thought is nice always get different comment from other people. I had puzzle for sometime and has really no clue on that. Until today, when I had a stack of 3 months photo to process, I realize one thing - All these years, I had pick the "good" photo according to my memory on the event, not based on what I saw on the photo.

This sounds really a bit weird but, this is what I experience. Usually I used to pick out the "good" photo straight after the event, while the memory in my head is still fresh. This actually had somehow blinding myself as I was trying to pick out a photo based on what I remembered during that moment instead of the resulting image which sit in my storage.

A good photo come with 3 main components:

  1. Good composition.
  2. In focus.
  3. Tell a story.
Good composition:
What makes out of a good composition? It means when you photograph an object, it doesn't somehow get cut off here and there, like a half headed man. Well, we can always argue about the artistic value of breaking the rules, but usually it turns out to be bad.

How about a shots that is too busy? Usually this type of shots can be saved, as cropping and tilting in post process is easy. When I decided to use this type of shot, it means that it has recorded down a very special moment. :)

In focus:
A photo in focus is really important, a sharp image really stand out. :)
There is only that much of unsharp mask you can apply in photoshop before it starts to get lots of noise and halo. So, make sure to pick a really sharp (in focus) photo. :) Unless you got no more choice. :P

Tell a story:
This is the most important factor out of the 3. A photo tell a story is priceless, no matter it is good composition or in focus or not. :P
Use this as the first priority when picking out a good photo. :)

Tuesday, February 7, 2012

Paper Iphone dock

One of my friend who recently got himself an iphone 4s has start his craze over the accessories for the iphone. So, he showed me a vimeo which demonstrate the steps to make a DIY paper iphone dock. Well, why not give it a try? So, I started to try to DIY it.

Firstly, I tried on a thick paper (which is recycled from one of the useless printing), it is around 180gm I think. It is easy to cut and fold into the shape. When I tried to put on my iphone on it, it become like a sponge and totally can't stand the weight of my 3gs.


The stand model infront is what I use a 180gm paper. At the back is the 2nd model I build using a cardboard (mounting board) that I normally use it as the background for photo shooting. :P

So, no choice, have to bring out the thick cardboard to try it out. I was reluctant to use this because it is thick and hard to cut. For every line that I need to cut, I had to cut it 3 times repeatedly before it can really go through. I had really put some sweat on this work...

The assembly also seems harder where I need to use a pin to draw on the part where I need to fold it, or else there is no way to fold it (the cardboard is really tough).

Well, after make it into the shape, the iphone stand nicely there with charging cable attached! :P
Not bad after all.


Voila! Iphone stand nicely on the paper dock with sync charge cable attached. :P

Anyone interested can refer this website as well: dessinemoiunobjet

Tuesday, January 10, 2012

Reflections of my own experience and new year resolution!

Whenever I search through Google for photography tips, there will tonnes of results for me to go through. Well, sometimes if I'm lucky, I get some really good link which straight hit what I'm looking for. But most of the time, lots of time wasted before I get to something I want.

As a start, lets say I'll like to start learn about photography, I'll search for "photography beginner", "photography tips", "photography tutorial" and etc. And what is gonna hit is all the technical terms jargon which I have no ideas what it is about. Well, there are some good site which give a good guide for starts on photography.

Once I get used of some technique and understand a little bit of those technical terms, I start to hit some bottleneck. Then, I start to search for "Top 10 tips in portrait photography" and etc. And again, thousands of links for me to filter through. I'll say that there is no absolutely best site as most of them are talking about the similar thing.

As I fed up with search online, I start to buy magazine (thank god there is Malaysia version of DCM and Digital SLR Photography). There are really good information inside, yet there is lots of technical knowledge you need to learn. The worst part about magazine is the luring of the new fancy camera model and lenses, somehow I felt that it is trying to psycho me to purchase those expensive equipment instead of teaching how to utilize my current gears.

After years of messing around with technical information and soulless photo, I realize one thing that all these source of information are missing about photography -> The artistic and humanistic part of the photography. There are really very little site that talk about the mentality of the photographer should have, how to be a creative person (photography is about art!), and etc. I realize this when I read this entry of Chase Jarvis blog 10 Things Every Creative Person Must Learn. It is a very simple entry, with every single point hit right into my heart to realize that "This is what I'm looking for!".

Now, I set rules for myself when I'm out to take photograph:
1. Stay focus, I'm suppose to take photo, so take lots of photo!
2. 60D must always in my hand with power on, not in the bag or around my neck.
3. No 4square check-in when I'm with my camera, go hell 4square, taking photo is priority #1!
4. Prepare my mood for photography (I had bad EQ, so when I'm not in the mood, I might end up bring the camera out and back with 0 shutter click).
5. Probability calculation: If I get 1 good photo out of 100, and I want 10 good photo, I must press the shutter at least 1000 times.
6. Be hardworking!
7. Cycle 3 times a week (>=30mins), stamina count when it comes to photography as I need to drag around at least a few kgs. :P

Hmmm....these can be my 2012 resolution. :P

Saturday, June 11, 2011

Kapsiao #3 - The Basic of Lighting in Photography

After talk about composition, now we can jump into the other essential part of a photograph - Light. This is a really tough one especially with all the advance and sophisticated algorithm the camera maker put into your camera.

For me, lighting consists of 2 parts:
  1. Brightness (Exposure)
  2. Color (White Balance)
I usually take care of the brightness when shooting and fine tune the color later in post processing. That's why I always shoot in RAW. :P

I once hear a saying "Every exposure is a guess" and I'm totally agree with it. Firstly, I look through the viewfinder and make the first level guess on the exposure. Then, my camera "brain" make the second level guess. After I press down the shutter and review......damn, not what I want! Then, I'll start to turn all the dials and buttons to retake and retake to just get the correct exposure.

So, firstly, lets take a look and understand about exposure first. For me, exposure of a photo basically means how much light are allowed to be exists on the photograph. In another word, it determines the brightness of the photo.

Now that I understand what is an exposure, the next question is how can I control it? The good things about all the modern camera is the camera can make a good guess for me. The bad thing is when you want to fully control it, you have to guess what the camera guess for you. :P

So, what elements actually build up exposure? Here, this is the 2nd important equation in photography (according to my own understanding):
Exposure = Aperture : Shutter Speed : ISO
So, from the above equation, we know that to achieve a certain exposure, you need the correct ratio between aperture, shutter speed and ISO.

The current digital camera system always use middle gray as the reference point for exposure, which means if you take a scene with lots of white area (such as snow scene or a white wall), the camera will set your aperture, shutter speed and ISO to achieve the white area as middle gray. So, if you has the experience before, you always see that type of photo keep under exposed (not bright enough).

With that, now we know what the camera guess for us and we'll need to know how to cheat around it. :P

For a decent camera, there will be a few option offered for the photographer to control the exposure:
  1. Auto
  2. Program
  3. Av (aperture priority)
  4. Tv (shutter speed priority)
  5. Manual
Sample dial on an LX3:


Sample dial on 350D:


It seems a lots and complicated right? Don't worry, just remember the above equation will do, as that is all about the brightness of the photograph.

So, below is according to my understanding about each of the option (it is usually called "mode" in photography term):
  1. Auto:
    • User Control: Exposure
    • Camera Calculate: Aperture, Shutter Speed, ISO
    • Common Use: When you don't know number 2 - 4, use this!
    • Outdoor: 99.9% ok.
    • Indoor: 99.9% gone case.
  2. Program:
    • User Control: Exposure, ISO
    • Camera Calculate: Aperture, Shutter Speed
    • Common Use: When you have no idea what is aperture and shutter speed, but you want to have some control on how bright is your photo, use this.
    • Outdoor: 99.9% ok.
    • Indoor: 99.9% gone case.
  3. Av:
    • User Control: Exposure, Aperture, ISO
    • Camera Calculate: Shutter Speed
    • Common Use: Portrait, still life, macro, landscape.
    • Outdoor: 99.9% ok.
    • Indoor: 50% ok.
  4. Tv:
    • User Control: Exposure, Shutter Speed, ISO
    • Camera Calculate: Aperture
    • Common Use: Action, Sports, Panning.
    • Outdoor: 99.9% ok.
    • Indoor: 50% ok.
  5. Manual:
    • User Control: Aperture, Shutter Speed, ISO
    • Camera Calculate: Exposure
    • Common Use: Studio shot, indoor with external flash.
    • Outdoor: 50% ok.
    • Indoor: 80% ok.
Ok, by now you should be a bit blur already, after looking at all the numbers. Firstly I'll need to clarify on the percentage numbering:
    1. The number is representing the percentage of successfully getting the lighting I want for my photo.
    2. The photo must be sharp and in focus to be count as success.
    3. Based on my own experience.
    Secondly, the bold control is the main priority why I choose to use that mode. So:
    • When I choose Auto, I'm lazy. :P
    • When I choose Program, means I accidentally use it. :P
    • When I choose Av, I want to control the bokeh.
    • When I choose Tv, I want to control the sharpness of the photo.
    • When I choose Manual, I want to control the exposure instead of depends on the camera algorithm.
    Now that we are done with brightness control, it is time to take a look at the 2nd part of lighting -> Color.
      The main feature in camera control on color will be basic White Balance (WB) control. Besides the normal white balance control, there is custom WB and Tone Control as well.

      Let's start with the basic white balance settings available on the camera:
      1. Auto
      2. Daylight - 5200K
      3. Shade - 7000K
      4. Cloudy - 6000K
      5. Tungsten - 3200K
      6. White fluorescent light - 4000K
      7. Flash
      On a normal digital camera, above is the option that usually you'll be able to set for white balance. Each of the option is actually a preset of a color temperature value (the ""K" number beside the setting) to suit the common lighting situation. The higher the "K" number (Kelvin value), the photo will be more red (warm). The lower the "K" number, the photo will be more blue (cool). All these setting is for color pic, if you are shooting black and white, these will not be applicable. Anyway, I don't recommend to shoot black and white directly on the camera as once it is black and white, you have no way to turn the color back on. So, I always shoot color and only convert to black and white during post processing.

      All the mode for white balance setting is self explanatory, but it doesn't means you can only use it when you are in that lighting condition. For example, you can set to "Cloudy" even when you are in broad daylight to make your photo looks even more warm. So, there is no hard rule on when you should use each of the setting, those words are merely a guideline for you. Once you are familiar to the effect of the setting, you can utilize it in your own way to get the "feel" you want to in your photograph.

      Below is an example of a photo in different white balance settings:
      1. Auto:
      2. Daylight:
      3. Shade:
      4. Cloudy:
      5. Tungsten:
      6. White fluorescent light:
      7. Flash:

      If you have a more advance camera, sometimes there are 2 white fuorescent light setting, just choose the one suit you the best by previewing the photo. :P

      If you are a RAW lovers like me, then you has less concern on the white balance setting as you can do whatever you like (changing white balance settings) in the software. :P

      For some of the pro, they'll prefer the "custom WB" in their dslr. When you are in a difficult lighting situation where none of the preset WB mode gonna work for you, "custom WB" is the fastest and easiest way to get the white color looks white in your photo. How is actually the custom WB work? Basically below are the steps:
      1. Snap a plain single color photo (white color). Below is the example.
      2. Go to your camera menu, select "Custom White Balance".
      3. The camera will display the compatible photos that can be use to set your white color point. Select the photo you want to use.
      4. Done.
      Now, change your white balance setting to "Custom White Balance" and snap a photo. Compare it with using "Auto White Balance" mode. You should see a difference.

      Below is an example of the differences between custom WB and auto WB (Based on the setting above).
      Custom WB:


      Auto WB:


      So, you can see that custom WB doesn't necessary give you the best result you want to. This means that just use this when any of the white balance fail to give you the correct color setting. To say the truth, I never use custom WB as my 60D has full control on color temperature value through the "K" value setting. Besides that, I shoot RAW, which means 99% of the time my WB setting is on Auto. :P

      Now, we go into the "Tone Control". Tone control basically manipulating the 3 color channel (red, green and blue) to achieve color that is out of what you see at the scene.

      Common in-camera tone control settings:
      1. Sephia
      2. Black and White
      3. High Contrast
      4. Low Contrast
      5. Solarise
      6. Film Negative
      Again, all the effects above are easily achievable through post processing software. So, there is no need to waste time navigating around the camera manual to try to set the tone to your likings. You will have lots of time during post processing. :P
        That's all on the basic of lighting. Hopes that it helps to give you an idea on how to utilize your in-camera lighting control. :P

        Monday, May 23, 2011

        Kapsiao #2 - Composition Cont.

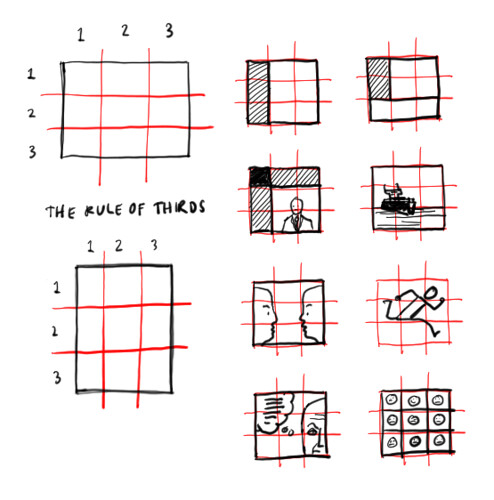
        Now, we know about the Rule of Thirds, it is time to look at other things that we need to take care when we compose a photo.

        Rule #1: Simple
        Definition: Means that the message you wish to bring out from your photograph must be clear, direct and simple. I always has a practice of try to describe my photo with only one word. If I can't, it means that the photo is not clear and not good enough. That's why all the photos that being displayed or hang in an art gallery or exhibition is always very simple.

        Method #1: The subject must be in focus and sharp.
        Method #2: The background must be clean with least information possible.

        Example #1: Indoor portrait shot

        1/125s, f2.8, ISO 2000 at 50mm.

        In portrait shot, it is important to have a wide aperture lens, be it an expensive 24-70mm f2.8, 17-50mm f2.8, 35mm f1.4, 50mm f1.2 or the cheap and good 50mm f1.8. You'll really need a wide fix aperture lens indoor for the shutter speed and the bokeh. In the above shot, if I'm using the normal f5.6 lens, I'll need to boost my ISO more to get the adequate shutter speed to avoid hand shake, and there is no way to bokeh out the bowl on the left side and the background.

        Example #2: Studio shot

        1/125s, f/4.5, ISO 200 at 50mm.
        The other easiest way to get a clean and nice shot is in a light studio. The great thing about shooting photograph in a studio is that you have full control on how the light should be. There is no natural sunlight involved and you can control all the lighting power to your liking.

        Rule #2: Lines and Pattern
        Definition: Always look for lines or repetitive pattern to include in your photo to make it more interesting "IF POSSIBLE". Do not purposely look for one as it will start to look awkward in the photo. Train your eyes to sense it when you are out to take photograph.

        Method #1: Diagonal line - Diagonal line can always add depth to the photo.
        Method #2: S curve.
        Method #3: Repetitive pattern.

        Example #1:

        1/2000s, f/2.8, ISO 250 at 50mm.

        This photo looks attractive and interesting as the camera is being tilted to create the diagonal line using the wood flooring to direct the focus from the line to the shoe. If the photo being composed where the wooden floor is in vertical or horizontal, the photo won't be as interesting as this.

        Example #2:

        1/250s, f/2.2, ISO 400 at 6.8mm (Panasonic Lumix LX3)
        This photo utilize the curve design and repetitive pattern of the carts and floor tiles as the main attraction.


        Rule #3: Balance (Symmetry)
        Definition: Composition balancing can either make the photo good or bad, there will be no in the middle. There are times that you'll need to make the composition off balance or vice versa. It is really situational and lots of practice and experience needed. There is no right or wrong in this and practice is the only key to success. However, most of the time symmetry is needed in a landscape photo shooting. There will not be lots of times that you'll need to push thing off balance, especially when shooting a straight road, building, landmark and etc. The only time that you'll think about ratio is when you shooting sunrise or sunset, and especially when it involves sea and sky, which you'll need to carefully think about what is the ratio between the sky and the sea you'll like to compose.

        Method #1: Skyline
        Method #2: Mirror

        Example #1:

        1/640s, f/5.6, ISO 100 at 10mm
        As usual, when there is symmetry pattern, I'll fully utilize it during a landscape shot as it always give a very interesting perspective of the building.

        Example #2:

        30s, f/25, ISO 100 at 28mm.

        Typical sunrise/sunset shot, where you have to plan out properly on the ratio between the sky and the sea. a 50:50 split is a no no, as it will looks weird and can't bring out anything interesting at all. Try it out and you'll know what I mean.

        Example #3:

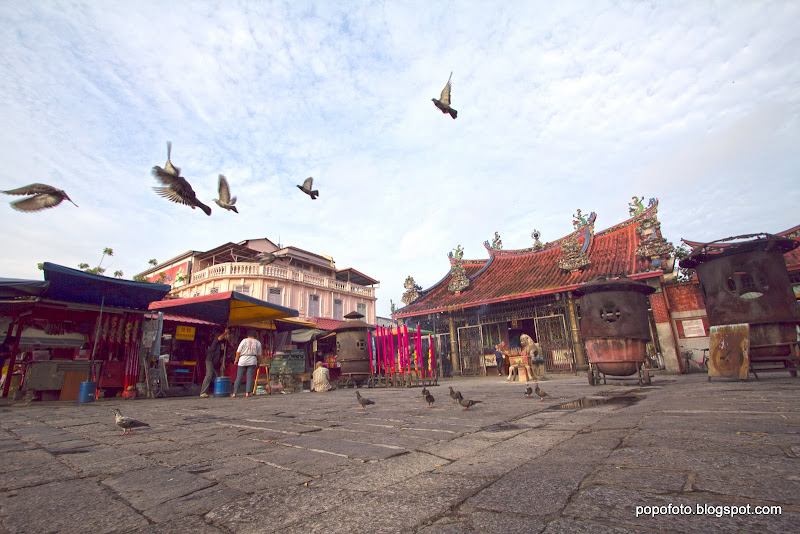
        1/400s, f/8, ISO 100 at 10mm.

        This is an example where some balance is being throwing off. Notice that the horizon is being thrown off a bit to bring out the flying pigeon, make the photo a bit more alive.


        Rule #4: Frame in Frame
        Definition:
        There is sometimes you can frame a photo in a photo, which bring out more depth of the photo and more story telling in it. But this is not an easy work, as to make it right really need some real hardwork to train the eyes, hands, legs, waist and every single part of your body to adapt to it. :P
        Method #1: Window
        Method #2: Arc
        Method #3: Chair
        Method #4: Cropping

        Example #1:

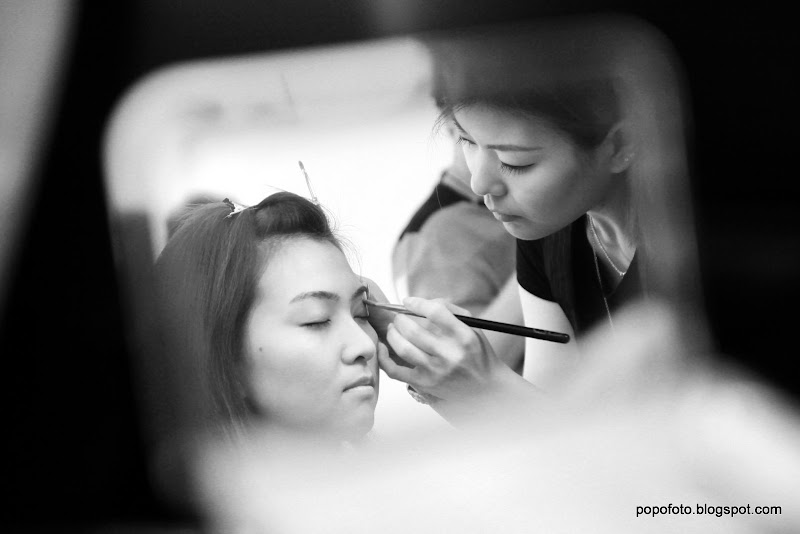
        1/15s, f/2.8, ISO 500 at 50mm.

        This shot I utilize a makeup mirror, place it strategically to get the reflection of the bride make up in action. This is the type of shot where your whole body need to work hard to get the right composition. :P

        Example #2:

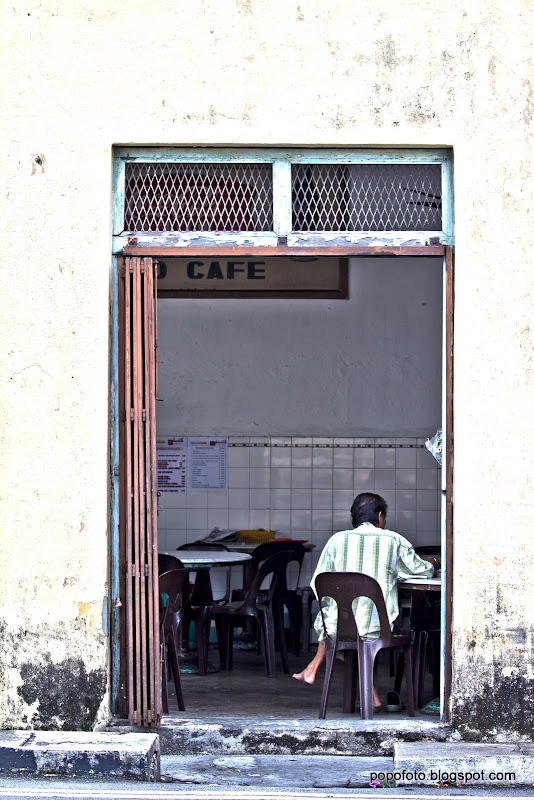
        1/200s, f/2.8, ISO 100 at 70mm.
        I utilize the door frame as the frame for the man relaxing in a coffeeshop. Imagine if I just zoom in to the man and the door frame is the frame of this photo, it'll be more boring and less information can be presented out.

        Example #3:

        1/100s, f/3.5, ISO 400 at 50mm.

        Using the bathroom mirror, I catch this shot to show the feeling of the bride waiting for the groom.


        Rule #5: Clean Background
        Definition:
        This is the part where dslr win out compare with a point and shoot camera. To clean up the background, it is not easy if you don't have a good lens with a dslr. This is the part where expensive glass make a difference compare with its cheapo companion. Also, this is where all the pro and master constantly poison their friend and disciple to buy the expensive glass. :P

        Do not ever think of postp the bokeh eventhough it is possible. For today's postp software standard, we still can't mock up a bokeh in a split of second just like when you turn the aperture dial on your dslr. So, for me, I don't want to waste my time to postp in the bokeh for each photo, so I slim down my wallet for those expensive glasses. :P

        There is certain time you can find a good way to clean up the background through viewing point, especially there is single color wall, clear nice sky, nice flooring pattern or just plain floor which will help. This is limited and by chance, so having a good lens is still the best solution. :)
        Method #1: Depth of Field control
        Method #2: Viewing Point

        Example #1:

        1/800s, f/8, ISO 200 at 22mm.

        This shot was taken when there is really nice cloud pattern on the sky, where I use the sky as the clean background to bring out the lamp post.

        Example #2:

        1/160s, f/2.8, ISO 400 at 26mm.
        I use the window and sunlight to overexpose the window and make it clean at the background. So, the main subject, the shoe standout in the photo.

        Example #3:

        1/15s, f/2.8, ISO 200 at 50mm.

        This is where the expensive lens become handy. Without the wide aperture at f/2.8, I'll get a busy background at the back which will become distraction in the photo. With aperture wide open, the background is blur out and create nice bokeh.

        Rule #6: Hardworking
        Definition:
        I'm a lazy person, especially on pressing the shutter. So, don't be like me. You need to be hardworking, work your brain, eyes, hand, leg and any parts of your body necessary to get the shots you want! This is very important as that is the differences between a good photographer and a camera owner. One very important part when trying to be hardworking is -> Don't risk your life!

        Seriously, I had seen photographer try to go in the middle of highway to take shot, climbing up and hanging on the flimsy staircase to take shot, try to handle 3 lens with 2 hands and 2 dslr bodies, step down into the sea braving the waves and risk the camera and etc.
        Method #1: Take more shots on the same scene with different perspective.
        Warning: DO NOT take multiple shots of the same scene with the same setting and the same composition eventhough digital memory card is cheap. Don't make yourself choosing 1 out of 50 photos and all of them looks the same.

        Method #2: Try different lighting on the same scene.

        Method #3: Do more exercise, you need all those extra energy in your brains and muscles to get nice shots!

        That's all for this round. Ciao!

        Monday, May 2, 2011

        DIY #1: Mini home lighting studio. :P

        It has been always my dream to have a studio by myself, the only problem is the wallet is too thin. After I got my own house 4 years ago, I had plan to make a studio using the top study room. Well, with 2 babies and all the works from the company, I don't really have much time to go plan out and implement it. The force is just not strong enough.

        This is why in photography, you need crowds, because your peers will apply pressure to you to make you have more motivation to implement something. And thanks to my photography buddy -> ikan and his kapsiaoness, I start to feel the strong force in my heart to make it happens since 2 weeks ago.

        After 2 weeks of shopping (with failure to visit a stationery shop for multiple times), finally I have time for my studio building at Labor Day. :P

        As I'm not rich bastet who can afford a renovation and installation of all the expensive strobing light and background, I decided to do some DIY (again, infected by DIY enthusiast -> ikan).

        Firstly, is the background. As I'm not planning for something big, I decided to get lots of colorful paper:

        I bought the biggest piece I can find from the shop and it cost me RM1.60 each.

        Second, need to prepare the strobe light. As I have only one flash, so I try with single strobe first. If the result is ok, then I'll stop at there. If not, maybe need to burn wallet already.

        Again, since my budget is tight, I reuse my RM30 tripod with velcro strips to hold the umbrella.

        The result:

        The strobe light #1 with umbrella attached on the tripod.

        Single strobe light setup:

        I use my workbench as the base, then bought a white cardboard and just let it curve naturally from the wall to the table. To avoid it from slipping, I use the cutting mat to hold it. So, this is a non-tape setup.

        The photo result with single strobe:

        From the result photo, can see that the light on the cup is not that even where left side is brighter than the right side and can notice the soft shadow on the right side.

        So, no choice but need a 2nd light source. The first thing come to my mind is "Yongnuo", lol.....but it will still burn a big hole in my wallet. Then, I saw the Philips tornado essential 18w light bulb in my drawer, suddenly I found my 2nd light source! So, I went to electrical shop and bought a wire extension for the light bulb.
        Tada! 2 strobe light. :P

        Muahahaha.......:P Saw the 4 cloth clips? I use that to hold different color background cardboard to the first cardboard. :P Now I have my mini studio.

        The result:

        See, shadow eliminated. :P But having a white background for white stuff is just not nice.....


        Now, this looks much better. :)

        Tuesday, April 26, 2011

        Kapsiao #1 - What is Photography

        After the photography myth busting, now is the time for me to share what is photography. After 6 years of holding dslr, finally I understand and grab what is the meaning of photography. For me, photography means to capture the precious moment that I wish to keep as a memory with ANYTHING THAT CAN TAKE A PHOTO.

        Now, why I caps those words, because it took me sometime before I truely understand about photography. Well, most of the people understand the first part "capture the precious moment", but mostly miss out the "ANYTHING THAT CAN TAKE A PHOTO". So, sometimes, when I was out, with only my iphone, and here comes some really touching scene, the first thing in my mind was "Only if I have my 60D/LX3 then I can really take a nice photo". When I finish the thought, everything is gone. Or when I snap photo using my iphone, the condition way pass its ability and it becomes blur, it is seldom hit my mind that to switch it to video mode and just take it as a video.

        Now, I had understand both part, it comes to the question on how to really take a "nice" photo. First, we had to understand what make up a photo. For me, there are only 2 parts to construct a photo:

        1. Composition
        2. Light
        and in my own context:
        Composition = My eyes
        Light = My feeling
        Ok, now come the tough part. As Composition represents my eyes and Light represents my feeling, how do I convey those through the photo? Between composition and light, composition is easier to understand and control, plus light is now very well control by the algorithm in the camera. So, I'll talk about composition first.

        In simple term, composition is about translating what my eyes see into photo, it is about what subject and what message I wish to convey. Now, there are lots of things in composition, and here I'll talk about the most important part of composition first, which is:
        Framing
        So, what is the important things we need to realize when we do framing is the point of view. One huge difference that we always miss out is that human's eye view is much wider compare with camera's lens, that''s why lots of people who just start on photography always feel disappointed and lots of hesitation when try to take photo. That's why it is very important to practice on framing first as a start for photography.

        Now, how to practice on framing effectively? For me, I always use a fixed lens (prime lens). When you have no option to change your view angle (can't zoom in or out), you are force to work hard to frame your photo, and sometimes you'll get new idea on framing as well.

        So, next question is what to frame? The most important is the subject. The subject must always in the frame, and where to place your subject in the frame is depends on the individual preference. Anyway, there is some standards when you take photo...

        1. Portrait: The key is to always take the photo at the same eye levels as your model, and careful with the framing to ensure no chop hand, chop leg, chop head or tree growing out from the head. Example:

        In this photo, if you look carefully, you can see that there is a tree growing out from the head, the only thing is that the expensive f2.8 lens successfully blur it out and it becomes not obvious, thus save the photo. :P

        2. Landscape: Make sure the main subject, the sun, the tree, the building, the road, the river are clear from any distraction. This is the main challenge in landscape photography. Example:

        In this photo, notice the 2 big burning oven on the right side? It will be nice if it is not there, but sometime we have to compromise to the situation, or be very hardwork running here and there to get the best shot (I'm lazy, so I just shoot the pic. :P)

        So, here comes the ONLY technical terms I know for composition which has serve me well enough:
        Rule of Third
        What is "Rule of Third"? It means to place your subject at the focus point in the frame, which is like below (found the illustration from google search):
        Now, if you check back the 2 examples I shown above, you'll realize that the main subject is on the focus point in the frame according to "Rule of Third".

        The toughest part about "Rule of Third" is the execution part. The theory itself is simple, but usually (just like me last time) people will tend to place the subject in the center of the frame and it took me like 1 - 2 years to fix that (since no one is guiding me...).

        So, lastly, good luck in practicing on composition......more to come in the next article. :P

        Friday, April 22, 2011

        Kapsiao #0 - Prelude

        I always thinking, if giving me a chance to start from zero on photography, what type of the classes or training that I'll like to get in the first place. A super technical one? starting on all the different types of body and lenses explanation and its usage? on the field training?

        After the first read of the Neil's On-camera flash 'bible', I realize that all this while, I'm looking for a guidance for photography which can be conducted in lay man terms, with no technical jargon and wordings, no poisoning of buying more and more lenses or body upgrade.  A guidance which can teach me more on photography within the limits of what I have in my hand, instead of telling me what I should buy to overcome the limitation.

        So, here is this that I'm starting my own sharing group so that people don't need to go through the hard lessons just like myself.

        Since I'm not a pro photographer, I won't call the sharing as "sharing", I rather call it "kapsiao". Another meaning of "kapsiao" is "talk cock", or just talking for fun. So, for some of the information that I put in here, don't take it too seriously. :P

        As a start, I'll like to do something to clear up everyone's mind first, which I name it as "Photography Myth Busting".

        Myth #1: If I have a dslr, my photo will look much nicer.
        kapsiao reply: This is like "I can play badminton as well as Lee Chong Wei, if I have his racket". Time to wake up.

        Myth #2: The bigger the camera and lens, the better the photo will looks like.
        kapsiao reply: This will only make you looks like a pro, sounds like a pro, act like a pro. But the photo......

        Myth #3: The more buttons I have on my camera, the better it is.
        kapsiao reply: While you pressing all that buttons you have, the scene you wish to take should be gone for N times already...and, I think there are lots of pro photographer out there dreaming for a camera with only one button which can take whatever shots they wish to. :P

        Myth #4: I can't take good photo with my camera, I should buy a better one.
        kapsiao reply: If you can't

        Myth #5: I can take good photo by mimic and follow what the pro photographer doing on the scene.
        kapsiao reply: This is like "If I just follow whatever Warrent Buffet is doing, I can be as rich as him". Again, WAKE UP!!! And if you have this idea, please please please don't ever do it, as most likely the pro on a job or assignment will be very annoyed by your action. Just like this one --> Spot the photographer

        Myth #6: I buy all the lens available and I can take any kind of photograph.
        kapsiao reply: You can buy badminton racket, football, basketball, golf club, but it doesn't make you a pro in all of them. Be a photographer and don't be a lens collector (If you want to be a lens collector, please buy all the Canon mount version, since I'm using Canon camera. :P)

        Myth #7: My photo is not sharp, I need the L lens.
        kapsiao reply: There is a lots of reason to this, make sure everything has been check properly before you go and burn a whole in your wallet. But I admit L lens will help. :P

        Myth #8: It is ok if my photo is not nice, everything can be fix in photoshop.
        kapsiao reply: You might want to consider to switch interest from photography to photo editing.

        Well, as I said, don't take the answer to seriously. :P

        Sunday, April 17, 2011

        Parkroyal Hotel Penang - Actual Wedding Day Photography Workshop

        When my sister ask me to shoot her wedding day, I start to think about what to shoot. It is her big day and I won't want to screw it up. Before this, I had shoot actual wedding day photo for friends, but it is not so intense and tension since there are lots of photographers there, I mostly just do the kapsiao thing around the place.

        This time is different, there is only one photographer --> me. So, there is 0 chance for me to screw it up. So, I really need more practice. Any kind of the photography is the same, the only way to improve is through guidance and practice! Now, here come the headache, wedding day photography is not like landscape, macro or portrait, it needs the whole ambience and environment, plus the bride, the makeup artist, the parents, friends and relatives to practice. Where can I get to practice????

        After the "A Day with A Pro" event with the pro - Kevin Chooi. I had him as my friend on facebook, and it is really by chance he is organizing an actual wedding day photography workshop! And the best part is the charges is low (RM120)! Without any hesitation, I directly signup for it.

        While waiting for the workshop, I also anxiously waiting for my Sigma 17-50mm f2.8 which I bought from Amazon and having my friend to bring it back for me. While day by day passed, more and more goodies from the workshop! Firstly, Parkroyal Hotel Penang is sponsoring the event by providing the facilities, and we got breakfast and lunch as well!

        When the day come (2011-03-27), I woke up early by 6.30am, since I stayed in mainland, after prepared everything, I start to move to turtle island and head towards the hotel at Batu Ferringhi. Too bad I still reach there 30 minutes late and Kevin already started his teaching. Fortunately I didn't really miss a lot.

        From the early briefing, it is really open eyes for me, as everything that I had attach to seems like in opposite direction....

        My technic: shoot in RAW, half snoot flash, custom WB
        Kevin's teaching: shoot in JPG, no flash, AWB

        Now, my head really blur. End up I decided to follow the teaching instead of against it. So, after the bride model and makeup artist reach the hotel, Kevin split the group (20 apprentice) into 3 groups. Then, we all head up to the room prepared by Parkroyal for the preparation shooting.

        While group 1 is shooting the makeup, me in group 3 is shooting the gown, shoes and rings.

        The room...it is pretty spacious since it can fit more than 20 peoples and still have plenty of room to move around.


        The gown.


        Night gown.


        The shoe.


        I like this shot a lot.


        The ring.


        The ring and the flower.


        The bed...

        Finally, it is turn for my group to shoot the makeup...

        Through the mirror...


        Makeup in action.

        Bride wearing shoe in action...


        Waiting anxiously for groom...


        Some random shots...


        Bonus: Pre-wedding training...:P Thank you Kevin!


        Really learn a lot from the workshop, and personally I had learn a lot from Kevin, since the first time at "A Day with A Pro" workshop...

        For those in Penang, if you like the Parkroyal Hotel, below is the website and gps coordinate for the hotel.

        Parkroyal Penang
        GPS coordinate: 5°28'19"N   100°14'46"E

        PARKROYAL Penang Resort

        Batu Ferringhi Beach, 11100 Penang
        Toll-Free Reservation:
        Within Malaysia: 1800 220 021
        Related Posts Plugin for WordPress, Blogger...