After talk about composition, now we can jump into the other essential part of a photograph - Light. This is a really tough one especially with all the advance and sophisticated algorithm the camera maker put into your camera.
For me, lighting consists of 2 parts:
- Brightness (Exposure)
- Color (White Balance)
I usually take care of the brightness when shooting and fine tune the color later in post processing. That's why I always shoot in RAW. :P
I once hear a saying "Every exposure is a guess" and I'm totally agree with it. Firstly, I look through the viewfinder and make the first level guess on the exposure. Then, my camera "brain" make the second level guess. After I press down the shutter and review......damn, not what I want! Then, I'll start to turn all the dials and buttons to retake and retake to just get the correct exposure.
So, firstly, lets take a look and understand about exposure first. For me, exposure of a photo basically means how much light are allowed to be exists on the photograph. In another word, it determines the brightness of the photo.
Now that I understand what is an exposure, the next question is how can I control it? The good things about all the modern camera is the camera can make a good guess for me. The bad thing is when you want to fully control it, you have to guess what the camera guess for you. :P
So, what elements actually build up exposure? Here, this is the 2nd important equation in photography (according to my own understanding):
Exposure = Aperture : Shutter Speed : ISO
So, from the above equation, we know that to achieve a certain exposure, you need the correct ratio between aperture, shutter speed and ISO.
The current digital camera system always use middle gray as the reference point for exposure, which means if you take a scene with lots of white area (such as snow scene or a white wall), the camera will set your aperture, shutter speed and ISO to achieve the white area as middle gray. So, if you has the experience before, you always see that type of photo keep under exposed (not bright enough).
With that, now we know what the camera guess for us and we'll need to know how to cheat around it. :P
For a decent camera, there will be a few option offered for the photographer to control the exposure:
- Auto
- Program
- Av (aperture priority)
- Tv (shutter speed priority)
- Manual
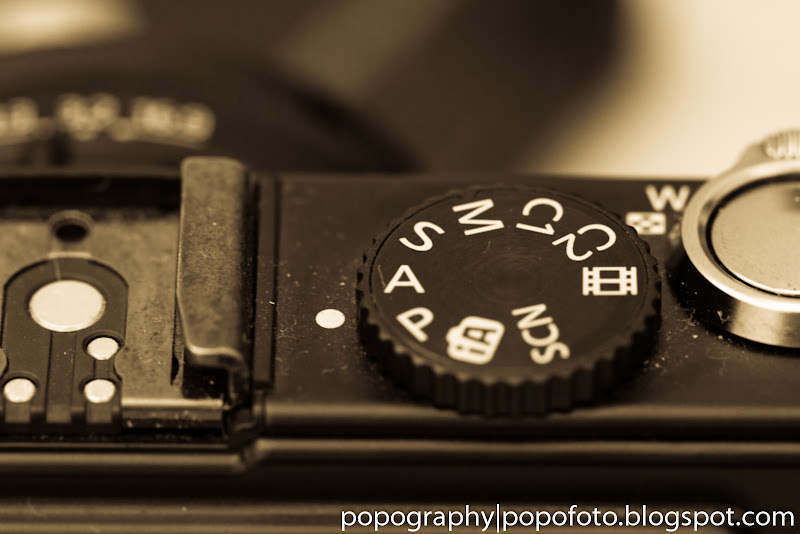
Sample dial on an LX3:
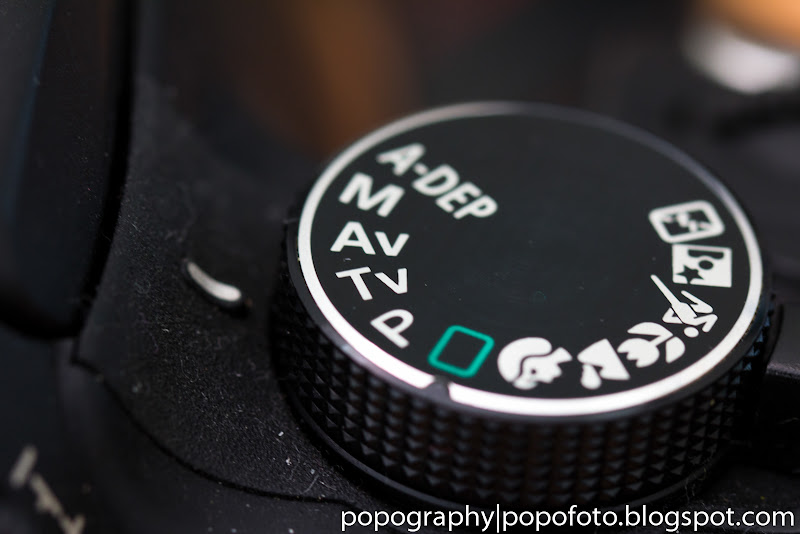
Sample dial on 350D:
It seems a lots and complicated right? Don't worry, just remember the above equation will do, as that is all about the brightness of the photograph.
So, below is according to my understanding about each of the option (it is usually called "mode" in photography term):
- Auto:
- User Control: Exposure
- Camera Calculate: Aperture, Shutter Speed, ISO
- Common Use: When you don't know number 2 - 4, use this!
- Outdoor: 99.9% ok.
- Indoor: 99.9% gone case.
- Program:
- User Control: Exposure, ISO
- Camera Calculate: Aperture, Shutter Speed
- Common Use: When you have no idea what is aperture and shutter speed, but you want to have some control on how bright is your photo, use this.
- Outdoor: 99.9% ok.
- Indoor: 99.9% gone case.
- Av:
- User Control: Exposure, Aperture, ISO
- Camera Calculate: Shutter Speed
- Common Use: Portrait, still life, macro, landscape.
- Outdoor: 99.9% ok.
- Indoor: 50% ok.
- Tv:
- User Control: Exposure, Shutter Speed, ISO
- Camera Calculate: Aperture
- Common Use: Action, Sports, Panning.
- Outdoor: 99.9% ok.
- Indoor: 50% ok.
- Manual:
- User Control: Aperture, Shutter Speed, ISO
- Camera Calculate: Exposure
- Common Use: Studio shot, indoor with external flash.
- Outdoor: 50% ok.
- Indoor: 80% ok.
Ok, by now you should be a bit blur already, after looking at all the numbers. Firstly I'll need to clarify on the percentage numbering:
- The number is representing the percentage of successfully getting the lighting I want for my photo.
- The photo must be sharp and in focus to be count as success.
- Based on my own experience.
Secondly, the bold control is the main priority why I choose to use that mode. So:
- When I choose Auto, I'm lazy. :P
- When I choose Program, means I accidentally use it. :P
- When I choose Av, I want to control the bokeh.
- When I choose Tv, I want to control the sharpness of the photo.
- When I choose Manual, I want to control the exposure instead of depends on the camera algorithm.
Now that we are done with brightness control, it is time to take a look at the 2nd part of lighting -> Color.
The main feature in camera control on color will be basic White Balance (WB) control. Besides the normal white balance control, there is custom WB and Tone Control as well.
Let's start with the basic white balance settings available on the camera:
- Auto
- Daylight - 5200K
- Shade - 7000K
- Cloudy - 6000K
- Tungsten - 3200K
- White fluorescent light - 4000K
- Flash
On a normal digital camera, above is the option that usually you'll be able to set for white balance. Each of the option is actually a preset of a color temperature value (the ""K" number beside the setting) to suit the common lighting situation. The higher the "K" number (Kelvin value), the photo will be more red (warm). The lower the "K" number, the photo will be more blue (cool). All these setting is for color pic, if you are shooting black and white, these will not be applicable. Anyway, I don't recommend to shoot black and white directly on the camera as once it is black and white, you have no way to turn the color back on. So, I always shoot color and only convert to black and white during post processing.
All the mode for white balance setting is self explanatory, but it doesn't means you can only use it when you are in that lighting condition. For example, you can set to "Cloudy" even when you are in broad daylight to make your photo looks even more warm. So, there is no hard rule on when you should use each of the setting, those words are merely a guideline for you. Once you are familiar to the effect of the setting, you can utilize it in your own way to get the "feel" you want to in your photograph.
Below is an example of a photo in different white balance settings:
- Auto:

- Daylight:

- Shade:

- Cloudy:

- Tungsten:

- White fluorescent light:

- Flash:

If you have a more advance camera, sometimes there are 2 white fuorescent light setting, just choose the one suit you the best by previewing the photo. :P
If you are a RAW lovers like me, then you has less concern on the white balance setting as you can do whatever you like (changing white balance settings) in the software. :P
For some of the pro, they'll prefer the "custom WB" in their dslr. When you are in a difficult lighting situation where none of the preset WB mode gonna work for you, "custom WB" is the fastest and easiest way to get the white color looks white in your photo. How is actually the custom WB work? Basically below are the steps:
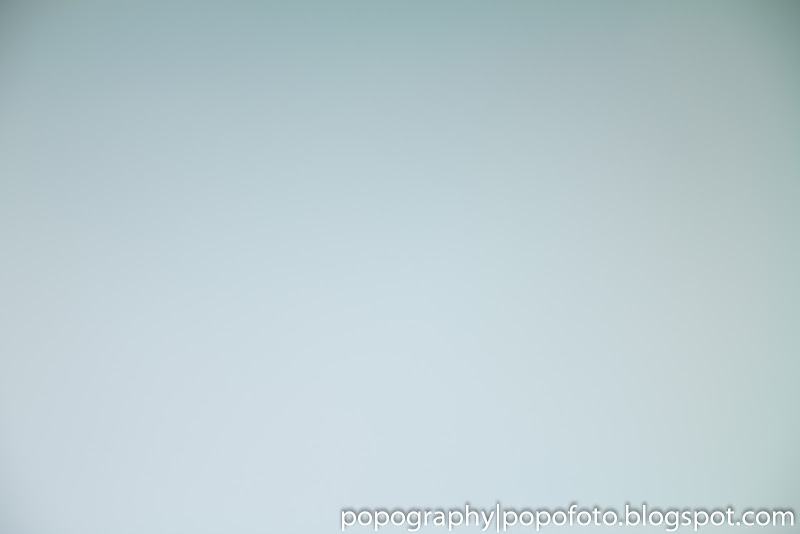
- Snap a plain single color photo (white color). Below is the example.
- Go to your camera menu, select "Custom White Balance".
- The camera will display the compatible photos that can be use to set your white color point. Select the photo you want to use.
- Done.
Now, change your white balance setting to "Custom White Balance" and snap a photo. Compare it with using "Auto White Balance" mode. You should see a difference.
Below is an example of the differences between custom WB and auto WB (Based on the setting above).
Custom WB:
Auto WB:
So, you can see that custom WB doesn't necessary give you the best result you want to. This means that just use this when any of the white balance fail to give you the correct color setting. To say the truth, I never use custom WB as my 60D has full control on color temperature value through the "K" value setting. Besides that, I shoot RAW, which means 99% of the time my WB setting is on Auto. :P
Now, we go into the "Tone Control". Tone control basically manipulating the 3 color channel (red, green and blue) to achieve color that is out of what you see at the scene.
Common in-camera tone control settings:
- Sephia
- Black and White
- High Contrast
- Low Contrast
- Solarise
- Film Negative
Again, all the effects above are easily achievable through post processing software. So, there is no need to waste time navigating around the camera manual to try to set the tone to your likings. You will have lots of time during post processing. :P
That's all on the basic of lighting. Hopes that it helps to give you an idea on how to utilize your in-camera lighting control. :P


