寻找天使

nuffnang

Showing posts with label TOOL. Show all posts

Tuesday, February 7, 2012

Paper Iphone dock

One of my friend who recently got himself an iphone 4s has start his craze over the accessories for the iphone. So, he showed me a vimeo which demonstrate the steps to make a DIY paper iphone dock. Well, why not give it a try? So, I started to try to DIY it.

Firstly, I tried on a thick paper (which is recycled from one of the useless printing), it is around 180gm I think. It is easy to cut and fold into the shape. When I tried to put on my iphone on it, it become like a sponge and totally can't stand the weight of my 3gs.


The stand model infront is what I use a 180gm paper. At the back is the 2nd model I build using a cardboard (mounting board) that I normally use it as the background for photo shooting. :P

So, no choice, have to bring out the thick cardboard to try it out. I was reluctant to use this because it is thick and hard to cut. For every line that I need to cut, I had to cut it 3 times repeatedly before it can really go through. I had really put some sweat on this work...

The assembly also seems harder where I need to use a pin to draw on the part where I need to fold it, or else there is no way to fold it (the cardboard is really tough).

Well, after make it into the shape, the iphone stand nicely there with charging cable attached! :P
Not bad after all.


Voila! Iphone stand nicely on the paper dock with sync charge cable attached. :P

Anyone interested can refer this website as well: dessinemoiunobjet

Saturday, September 3, 2011

Canon Digital Photo Professional 3.10.2 updater release

The new version release on 11th Aug 2011 according to canon's website. I take a look on the update history, and the update is only for the support on one of the new lens...Below is the update history taken from the software site.


Update History
Changes for Digital Photo Professional 3.10.2 Updater for Windows;

Supports new lens (EF-S 55-250mm f/4-5.6 IS II)
Below is the site for the software download:

Monday, May 2, 2011

DIY #1: Mini home lighting studio. :P

It has been always my dream to have a studio by myself, the only problem is the wallet is too thin. After I got my own house 4 years ago, I had plan to make a studio using the top study room. Well, with 2 babies and all the works from the company, I don't really have much time to go plan out and implement it. The force is just not strong enough.

This is why in photography, you need crowds, because your peers will apply pressure to you to make you have more motivation to implement something. And thanks to my photography buddy -> ikan and his kapsiaoness, I start to feel the strong force in my heart to make it happens since 2 weeks ago.

After 2 weeks of shopping (with failure to visit a stationery shop for multiple times), finally I have time for my studio building at Labor Day. :P

As I'm not rich bastet who can afford a renovation and installation of all the expensive strobing light and background, I decided to do some DIY (again, infected by DIY enthusiast -> ikan).

Firstly, is the background. As I'm not planning for something big, I decided to get lots of colorful paper:

I bought the biggest piece I can find from the shop and it cost me RM1.60 each.

Second, need to prepare the strobe light. As I have only one flash, so I try with single strobe first. If the result is ok, then I'll stop at there. If not, maybe need to burn wallet already.

Again, since my budget is tight, I reuse my RM30 tripod with velcro strips to hold the umbrella.

The result:

The strobe light #1 with umbrella attached on the tripod.

Single strobe light setup:

I use my workbench as the base, then bought a white cardboard and just let it curve naturally from the wall to the table. To avoid it from slipping, I use the cutting mat to hold it. So, this is a non-tape setup.

The photo result with single strobe:

From the result photo, can see that the light on the cup is not that even where left side is brighter than the right side and can notice the soft shadow on the right side.

So, no choice but need a 2nd light source. The first thing come to my mind is "Yongnuo", lol.....but it will still burn a big hole in my wallet. Then, I saw the Philips tornado essential 18w light bulb in my drawer, suddenly I found my 2nd light source! So, I went to electrical shop and bought a wire extension for the light bulb.
Tada! 2 strobe light. :P

Muahahaha.......:P Saw the 4 cloth clips? I use that to hold different color background cardboard to the first cardboard. :P Now I have my mini studio.

The result:

See, shadow eliminated. :P But having a white background for white stuff is just not nice.....


Now, this looks much better. :)

Monday, April 18, 2011

Sigma 17-50mm f2.8 - Muaks! Love the lens!

With my sister's wedding day getting near, it really gives me tons of reason to go on a shopping spree. :P
So, as usual, if you shooting for actual wedding day, the ultimate lens you can't afford to miss (if you are using an APS-C sensor dslr) is the 17-50mm f2.8.

There are a few choices for Canon camera:
1. Canon EF-S 17-55mm f2.8 IS USM - The King.
2. Tamron SP AF 17-50mm F/2.8 XR Di II VC LD Aspherical [IF] - The Longest Name
3. Sigma 17-50mm EX DC OS HSM - Best value (for me. :P)

I have always want to get choice #1, but the price always drive me away as I can actually get a Canon 70-200mm f2.8L USM with its price tag. Then, I look for choice #2, Tamron, always the cheapest in this range, but I had own Tamron 28-75mm f2.8, and I really don't like Tamron (my own problem lar).

I had never try a Sigma lens before, and from all the review I read on, seems like choice #3 really looks good. The price is not too high, the build quality also ok, IQ looks nice, seems like really value for money. So, I check out prices from Penang road and compare against shashinki and amazon, and found out that amazon is having the best deal! With my friend visiting US and coming back on time before the "Actual Wedding Day Photography Workshop", and with his permission, I ordered the lens from amazon and send to his apartment.

After 2 weeks, tada! lens in hand, kekekeke......

First impression when I hold it is -> solid! The best part is the lens come with a pouch (eventhough now the pouch perma stay in the drawer) and lens hood. The one part I always like about the 3rd party lens is got free lens hood! Unlike Canon's lens, only if you get the L lens that you are gonna get the free lens hood.


When I start to use the lens, there is one downside I straight away realized -> The zoom ring is tight! It is so hard to turn it smoothly, so no good for videography. Maybe it needs some wear and tear to make it smoother. :P


The switch for focusing and OS mechanism situated on the left side is big and obvious. So, you won't mistakenly switch it or not sure you had switch it or not when you are behind the view finder.
Another downside is the HSM, it is a micro HSM, so no full time manual focus overriding. Need to switch from AF to M for manual focusing. The motor is a bit noisy just like my Canon EF-S 18-200mm.


I always like the focusing distance window, but for the price I paid, I have to be satisfied with the marking on the focus ring. It is ok for me since I don't understand a single thing on it anyway. :P


The printing on the front of the lens.


The best part I like about Sigma -> Made in Japan! :P

Some test shots from the lens on 60D:

Custom made color gel. Learn this from a Pro -> Kevin Chooi


The tools for color gel making.


My photography buddy, and he is hardcore Nikon fans. so, Canon fans and Nikon fans can be together happily. :P


Lunch@Kim Gary, before getting a UV filter for the lens.


Test shot on a focus test chart. :P

Tuesday, January 4, 2011

Shutter count, how to check?

Well, Canon is well known of its shutter count hiding skills. It seems like it is impossible to check unless you send your camera back to Canon for its technician to dig out the info for you.

As always, I always believe there is another way to do it, especially I'm eager and interested to know my 350D shuttercount after 5 years of usage, I try to search through google (always my best friend) to see if there is any brilliant hacker out there had the job done.

There is a site astrojargon which has provide an EOSInfo utilities which allows us (the faithful Canon supporter) to retrieve the information. Well, eventhough not all models are supported, but at least those who own the lucky model will have a chance to know their shutter count at the tip of their finger.

The software able to show the shutter count for 5dMkII, 40D, 50D, 450D, and 1000D. Argggh! My camera model is out of luck......so, the search on google need to be continue......


Oh ya, there is a nice details guide on checking shutter count for every camera maker at digital-photography-school. Check it out! :)

Saturday, December 11, 2010

Canon 50mm f1.8 II - My another new toy...

Well, basically I owned this lens before (after that sold it off to one of my friend since it was under utilized). I had never be a fans of prime lens until recently acquired the Canon 100mm f2.8 USM. When I compare the IQ between the 100mm prime with my 18-200mm IS, I had keep my ultra zoom lens in the dry box and try to take photo using the 100mm.

The only problem is that 100mm is really long, especially for indoor portrait shots, so my hands itchy again and go back and get the 50mm again...:P

Some photos with the lens:


Nice, nice, nice......now I only use 50mm and 10-22mm USM to take photo. :P

Canon EOS 60D - My new toy...

It has never cross my mind that I'll need a new body in near time. It all hits when my current Canon 350D start some weird behavior firing the external flash during my "sotong" friend's wedding day (fortunately I'm not the sole photographer). It even more convincing when my "jelly fish" friend lost my CF card after the morning ceremony end.

Well, I do further test on my 350D and confirm that it'll trigger the flash, but only when it feels good (which means I have no idea when it'll fire, and it won't). Ok, I'm not the pro, but at least I know all the control of my dslr after using it for 5 years. I'm sure that the flash is attached properly and the flash is on trigger mode.

After asking on the price, wah......it is so much cheaper compare with 50D! Ya, there is some catch on the pricing:
1. No more metal body.
2. Joystick is gone (replaced with 8 direction pad on the 2nd scroll ring).
3. No more weather shield.
4. lower fps (not really much lower, from 6.3 -> 5.3). But I suspect this is due to the larger count of pixel on the sensor, 15Mpx -> 18Mpx.

But, there are lots of extra added in as well:
1. Articulating screen.
2. 1040,000 dots (3:2) LCD screen.
3. Higher ISO -> 6400.
4. Auto ISO mode with ISO limiter.
5. Full HD movie.
6. Wireless speedlight control.
7. Infra-red remote shutter release.
8. Lighter weight and smaller body design (compare with 50D). It feels nice in my hand!

So, based on all the above, I decided to get 60D instead of 550D which is in the same range as my 350D (must upgrade at least half a class. :P)


350D and 60D sitting side by side, you can see that 60D is not much bigger compare to 350D from the front.


If compare from the top, the 60D looks much larger. The mode dial and power switch is at different side, really need sometime to get use to it. But the extra LCD screen at the top is really nice and helpful.


Compare from the back. The 60D with LCD facing in, but can see that the screen size area is really lots of different! I really like the new screen, the old 350D LCD sometime make me frustrated as you can't really judge well by just looking at it (too small), especially for group photo where you thought everyone's eyes are open but when examine at pc, damn, there are 1 person with eyes close...that's why I really appreciate the 60D's 3 inch screen. :P


The new mode dial...


The 350D mode dial, which I prefer this more, really like the shining metal ring. :P


60D view finder size, much larger compare to 350D.


350D view finder, which sometimes I found it a bit small...:P


60D 2nd scroll ring with the integrated 8 directional pad. It needs sometime to get used to using it, currently I'm still try to getting used to it so that won't accidentally press the directional pad while I try to use the scroll.


350D 4 direction pad, it is really slow to try to change setting using this.


The top LCD screen at the right side. I like this!
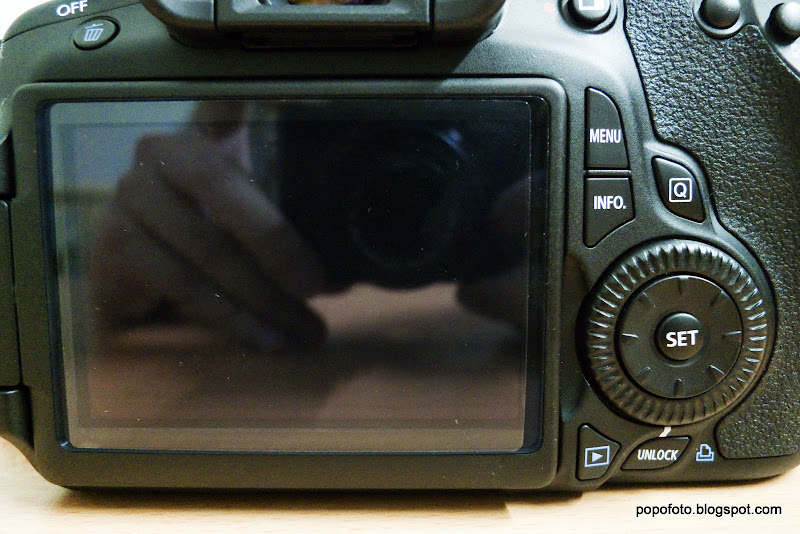

60D articulating screen!!!!! Love this.


350D screen.


60D sign, placed on top instead of bottom like 350D.


350D sign.


60D, ISO 6400


60D, ISO 1000


60D, ISO 2000

Ya, 60D ISO can go by 1/3 step!!!!!! nice......

Basically, eventhough Canon decided to strip off some X0D features, I'm still satisfied with the camera. Really amazed with how much advancement of the technology just after 5 years. :P
Related Posts Plugin for WordPress, Blogger...